Showing posts with label weddings. Show all posts

Saturday, June 29, 2013

They are Married! Part Three: The Bride's Jewelry


"Here comes the bride!"

So we have made it to the bride's jewelry, at last!    As with the bridesmaids' jewelry, we came up with multiple plans before we settled on the final design and materials.   One thing we agreed on from the start--there would be pearls!   


I purchased multiple strands of beautiful white freshwater pearls
 (9mm, Baroque and 6mm, Potato) for the bride 

Then I added high quality white opaque and clear faceted Czech crystals in a variety of sizes from several sources.  Some were used in the bridal set.  Others were used for the bridesmaids.  I tried twisting strands, though again, without much luck.  We considered six strands, then brought the number down to three.    Even at three, I realized that the necklace seemed heavy for fastening with a ribbon.  

I went back to Jenna and we discussed the necklace wrapping clear around her neck in strands instead.   By now I had a better idea of how much a well-designed clasp could make a difference in how nicely the necklace would hang.  So I went hunting for the perfect clasp for a 3-strand necklace.   


As in pieces described in Part 1 and Part 2 of this series, 
I found exactly what I was looking for at LilysOffering on Etsy.
The back of the necklace uses a solid sterling silver connector clasp.

Sterling silver bead caps were also used on the ends on each strand.  Because of my great fear that one of these heavy strands of beads might break, the bride's necklace was double-crimped on each end and covered with silver crimp covers.

Each strand was a combination of pearls and crystals, in graduated sizes. The smallest sizes at the neck, and the larger size beads on the longest strand.  The bead patterns were each different but complementary.  


I wasn't completely sure I had done well, until my niece tried it on the week before the wedding.   I feared the patterns were too busy.  But she looked absolutely beautiful in it even in her white t-shirt and jeans,  and then I knew all would be well!


I had sent her several earring samples electronically to view, and we both like the same pair the best!  


Bride's earrings in progress.

And finally, we came to the bracelet.  You would think we could finish this up easily, but no... We had decided early on that I would make a wire cuff bracelet with beads woven through and around it.  I had made two of these some years ago in different colors, but when I tried it this time, I just couldn't seem to get the wire to shape and harden as I envisioned it.  Not at all happy with my start, I went reconsidered the design.    I reconsidered numerous designs!

And I finally decided that a bracelet to echo the design of the necklace might be the best thing of all.   We consulted, agreed, and I sent photos of sterling silver bracelet clasps in such a variety I thought it might be a pain for her to decide.   But guess what?  In moments, she chose one of my absolute favorites again!  


(Sorry, you get my arm as a model here for a moment!)
I learned this is known as a "box clasp."
It seemed very secure and so in line with our beads and design,
neither of us could resist this one!

It's solid sterling silver with 2 side clasps, and a pearl within a bezel.
I found this beauty at LGKJewelrySupplies on Etsy.


At the bride's request, a few purple beads were added to the middle row of the bracelet.  The other beads were pearls, clear and white Czech glass crystals.


So, while Jenna and I knew what the jewelry would look like, it was secret to the rest of the world until the wedding day!

  
The bride's jewelry packaged for her wedding day!

And still, there was one more surprise for me!

One thing I never considered in all of this was the impact the dim romantic side lighting would make.    While it made photographing challenging...  (Most of my photos are blurs.   The Mother of the Groom has kindly let me share these pictures below with you...)   The lighting did have the most magnificent effect on the jewelry itself!

I never expected such sparkle!  


The bride, Jenna (left) with one of her bridesmaids, Meg (sister of the groom)!
Lovely young women in every respect!


And here is the ready bride, just waiting for the ceremony to begin!
So radiant, so lovely, and such a joy!


I will thank you all once more for supporting me during this time of preparation, for reading along here and sharing my joy that things turned out, and for your wishes that the bride, Jenna, and her husband, Jake, share a life filled with much happiness!

These are beautiful young people, very special to me, and it meant the world to get to create jewelry for their special day.      And you all are wonderful friends!   I'm so glad you were willing to share this with me too!

Best wishes always,

~Sharyl

**********************************
Image Credits:

Jewelry photos by Sharyl McMillian-Nelson, Sharyl's Jewelry, 2013.

Wedding photos by Mindy Kissner, 2013.  Used by permission.

**********************************
Independence Day sale begins TODAY!
Get 15% off all items 
at Sharyl's Jewelry on Artfire!
 6/29-7/7/2013.

Must use coupon code at checkout:  

 INDEPENDENCE15

Only one coupon code may be used at a time, 
but this code is good for all jewelry and components purchased.
You may share this code with others.
You may use the code as many times as you like during the sale period.
Thank you, and have a happy 4th!

***Please sign up for my 
to keep current on sales and promotions! ***

**********************************

Friday, June 28, 2013

The Wedding! Part Two: Gift Jewelry & More

Rehearsal Thank-you Gifts for Wedding Party:

Between making the bridesmaids' jewelry and the bridal set, I worked on gifts for the bride and groom to give to their wedding party.   They ended up with a wonderful collection of gifts  for their bridesmaids, groomsmen, and their close family.    My contribution, of course, was jewelry for the women in the wedding.    This was different from the jewelry they would wear during the wedding; it was a "thank-you" for being a part of the event.  

Handmade Lampwork Beads Rakuli Whirled

from Flame on Glass (Etsy)


Early on, I had found this lovely set of swirled lampwork beads that I purchased, just thinking they might be used for the wedding.  Once we decided on our other designs for the bridesmaids, I offered to put them to use for the thank-you gifts to be given out at the rehearsal dinner.   My niece like the idea, so I set them aside for that purpose.   

Time was starting to crunch a little when I got to these.  I knew I had just enough beads to put use one as a focal bead in each necklace.   Being a one-of-a-kind designer, and these being items the women would wear away from the wedding, I knew each should be unique.   It was so wonderful that the beads had streaks of many colors in addition to the central color of purple. 


 I pulled together some beads with coordinating colors, 
added some accent metal accent beads, 
and went to work designing.   

This was one of the most fun parts of the project for me.  While it would seem that it would take longer designing each necklace OOAK, I made 5 of the necklaces in one day and finished the others the next day.     I made most of the clasps myself by hand and antiqued them to match the chains.

I don't have photos of all the necklaces to show, but have a couple samples below.   The five bridesmaids and mothers-of-the bride and groom received necklaces with the purple swirl beads.  


Some had strung sections of beads attached to chain.
This one used freshwater pearls in two colors.  
Others used faceted Czech glass crystal. 
And others, small spacer handmade lampwork beads.


Others were pendants designed utilizing the focal bead and integrating others,
then hung on chain.  The bride matched each necklace to the recipient.

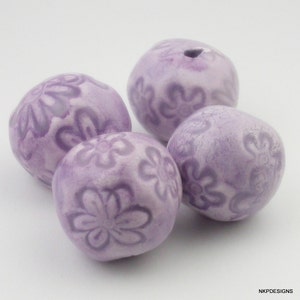
For the two junior bridesmaids, I selected a different style bead.  These purple pottery flower-stamped beads by Natalie Pappas from NKP Designs seemed to fit the theme and be a good match for the younger participants.


Dark African Violet Porcelain Daisy Imprint Beads*

from NKP Designs (Etsy)


Each of these younger women received a unique design created just for them.   


A Small Gift for the Bride Too:

While the bride was busy giving away gifts, it seemed only fitting she should receive one of her own:  


A little something in purple for the bride too! 
Earrings with lampwork glass beads from Koregon on Etsy.


Finally, What's the Jewelry Maker to Wear?

I'll add this last part here, although chronologically, it belongs at the very end of the story!   In all the scurrying, I nearly ended up with no jewelry for myself!   I was wearing a black skirt and pale blue-grey summer sweater.   I had made these earrings to sell this Spring, but never listed in my store, so I "claimed" them for myself!


The light blue swirled lampwork glass beads are from Koregon.
I patinized silver-plated brass leaves in pale blue to go with this pair of earrings and handmade the ear pieces from sterling silver filled wire.   
Similar altered and handmade metal jewelry components are for sale
 in my Sharyl's Jewelry store on ArtFire.


I had ordered a batch of beads in pale blue and blue-gray colors  and decided as the wedding neared to make myself a memory-wire bracelet.  This was the same technique used for the bridesmaids' bracelets.


And below is the necklace, which I made in the hotel room the morning of the wedding!   

Large lampwork bead from InspireGlassStudio on Etsy
"Light of India" Connector from LilysOffering on Etsy


"Something blue" for the jewelry designer to wear!


I hope you will join me next time for the final installment of "The Wedding!"   The bride's jewelry will be featured!  

Thank you all for reading along!  

Sharyl

******************************
Image Credits:

Photograph of  Dark African Violet Porcelain Daisy Imprint Beads taken by Natalie Pappas of
NKP Designs (Etsy).  Used by permission.   2013.

All other photos by Sharyl McMillian-Nelson, 2013.

******************************


Get 10% off + Free gift 
through the end of June 2013 
by using this coupon code at checkout:  

AW-10FREE

******************************


Tuesday, June 25, 2013

They are married! The Wedding Jewelry: Part One


Both bride and groom said their "I do's" in this lovely location 
at the wedding ceremony, Saturday evening, June 22.

But it all began way before then!   Before they gathered at 11am to begin their dressing, before the Friday night rehearsal and dinner, before the year-plus engagement, and even before that!   

Even planning for the jewelry, one small part, my small part, started nearly a year ago.    There were discussions regarding designs and materials, a mock-up necklace, and shopping for beads, wire, findings, and accent pieces.   

There was to be jewelry for the bride (my niece, Jenna), 5 bridesmaids, and 2 junior bridesmaids.   The colors the bride selected for the wedding were a deep purple and orange.    

File:RGV color wheel 1908.png
From Wikipedia

Did you ever consider how many shades of purple there really are?   Way more than I ever considered, I assure you!    In the Fall of 2012, I was busy ordering all the supplies I thought we would need.    For the bridesmaid necklaces, the bride and I had decided on ropes of purple pearls wrapped around one another going part way around the neck, then finished with long ribbons that would stream down the back.   There would be a few orange beads scattered among the strands.   It was the first decision made.   The bride's necklace would be in larger white pearls and a similar style,... but I get ahead of myself.   

The first sets of pearls that looked "just the right color" on my computer monitor to match the dresses turned out to look more a bright-pink once they arrived, and the "rethinking" began.    With the dresses solid dark purple, how would we ever make a good match ordering purple pearls to match?  Then a "light bulb" moment came, and we decided on purple crystals (which would reflect slightly different colors anyway) combined with white freshwater pearls.    And then, the worry, how to get the pearls the shape, size, color, quality and quantity we needed.   I heard my self say out loud, "If only I could see them first."   


And suddenly it occurred to me to visit one of our local independent bead stores,  

I walked in the door,  and I walked out with not only all the pearls I needed, but also what turned out to the perfect purple crystals for the bridesmaids!   What a huge relief that was!

I found these lovely connectors for the necklaces at what quickly became one of my favorite stores for sterling silver, LilysOffering on Etsy.


And I knew immediately where to go for our favorite, 
soft "Shabby Wrinkled Ribbons," 


Once I tried twisting these bead ropes though, I knew we had another bit of "redesigning" to do.  Perhaps because the bead section wasn't long enough, they wouldn't wrap more than once!   Not the look I was going for!   So, I tried this more simple design instead, and this is what we stayed with.  


By experimentation, I learned what worked well and what didn't
in making multi-strand necklaces hang properly.

You'll also see some loose space between the beads here.  I later filled these in with small decorative jump rings which made for a nice look.  And eventually got better with the crimping and crimp caps so that later necklaces had no gap showing.  Practice makes perfect (or at least much better)!


The bracelets were actually the first items I made.   While we considered other designs, memory wire won out for its ease of making so many bracelets and having one-size-fits-all.   I ordered dark purple and orange crystals and gemstones, believing that mixed together, they would blend.   A few ended up out of the color range, but most worked.  I added a little silver, mixed up the patterns on each, and added this charm on each end.


The spiral charms symbolize the journey of life.


It was satisfying to see this step finished!

And the last item made for the bridesmaids were their earrings.   They have the same basic look, but because  some prefer bigger/longer and others smaller/shorter, some dangly, others not, there is some subtle variety.  


Some variations on the bridesmaid earrings.


Some with larger beads.


Bridesmaid packages being prepared.


I was invited to the bridal party's wedding day preparations. 
Here, the bride, Jenna, is presenting the groom's sister, Meg, with her necklace. 

I came with my tools and beads, and back-up jewelry, just in case there were adjustments that needed to be made at the last minute.  What I witnessed instead was the bride presenting each bridesmaid her jewelry and helping each with her necklace. 

This was such a special part of the day for me, and believe it was for them as well!  The bridal party all looked so lovely!

We'll have more on the Wedding all this week!   Hope you'll be back!

~Sharyl

***************************************************************************


Get 10% off + Free gift 
through the end of June 2013 
by using this coupon code at checkout:  

AW-10FREE

***************************************************************************


Friday, June 21, 2013

The Wedding: Anxiously Waiting for the Big Day!


Some of you may recall my blog entry in May, "The 'Non-Reveal' Post," in which I spoke to you about making jewelry for my niece's upcoming wedding!    (I admit it, I've spoke of little else for months!)   

 At that time I had 15 items complete.

Latest (and possibly last)* Score:

Nearly 40 handmade jewelry items made for the bride and her wedding party!

*I'm taking my tools along so there's still a possibility of more!  

The long-anticipated day is fast-approaching now!   Everyone has been busy with preparations.   The bride-and-groom-to-be seem calm as ever.   

The jewelry is finished.  Everything has been "bride-approved."   The jewelry is carefully wrapped and tied up in boxes, name tags attached, packed in a large bag, and is ready to be delivered when the time is just right!  (Do you sense any excitement?!)


I've learned things I didn't expect to learn with the wedding project.  I'll be sharing more with you in the near future when I can show you some photos.

I worked with a partner, my niece, as in essence this was one large custom project, but I was given a great amount of freedom.    Nearly all the pieces ended with designs other than those we started with!   Luckily, my niece is very flexible and has a great sense of design and fashion!   


The bride-to-be at her wedding shower.

I can't begin to tell you or her how much this experience has meant to me.   She's very special to me and our family.  This has been my chance to be part of her day in my own unique way.  I'm so glad she trusted me with the task, and hope everything has turned out to make her wedding day the best it can be.

Beyond that, I hope their marriage is full of love, respect,  eternal kindness, happy days, cherished moments, and years that go on and on...

Happy wishes to all!

~Sharyl

P.S.  I must thank my two guys who didn't fuss when I took over the dining room as well as my office/workshop for jewelry-making during this time!   They have been very patient and supportive in many ways, and I'm grateful!

************************

Please share your wedding jewelry stories in the comments!   It can be jewelry you made for a wedding, jewelry you wore at your wedding, or anything related to jewelry and weddings!

************************