Showing posts with label learning. Show all posts

Wednesday, February 18, 2015

Most and Least Favorites

I think we all have our favorite parts of the jewelry business.  In addition to actually making the jewelry, learning about new tools, and techniques, and getting to meet nice people with similar interests, I've had one part of it I never expected to enjoy.   Photography!


My, how awful my photos were in the beginning! I've written multiple bog posts about it and my progress along the way.  (I had a period where all photos looked yellow, and another when they all looked blue.)  

For quite a long while I was in a macrophotography group and we shared our close-up photos each Sunday.  


I really enjoyed from that and learned a lot.  (I love taking photos of flowers, but also practiced on jewelry photos, furniture, buttons, all kinds of objects!)  And I've learned a lot from Facebook groups, blogs, books, and more.   There's always room for improvement and hopefully, I'll keep improving at photography as well as my jewelry and bead making skills!

My light tent for indoor jewelry photos.
Most of my photos are taken this way
so I can photograph in the night and all kinds of weather!

I'd love to hear hear what YOU enjoy most!   The feel of clay between your fingers?   Getting to pound on metal?    Jewelry displays and shows?  

I have 2 "least favorites"  too.   One is listing items ready to sell in my stores.  

My laptop stops smiling at me... notebook smiling

laptop trapand looks more like this during listing times.  I have piles of beads and jewelry that need listing.  I'll be trying to do more of that soon!    I am liking "copy" feature in Etsy rather than having to recreate every entry from scratch!   If any of you have other special tricks, procedures, or routines for listing products in your store, I hope you will share!


Finally, my absolute least favorite thing about the business is figuring TAXES.  I don't mind paying them nearly as much as I dislike preparing them!   UGH...   In fact, that is the task I've been working on lately and finished today... just in time to meet with the accountant.  


Now if any of you have found a way to keep good records throughout the year so you don't have an annual (or quarterly) nightmare, I would FOR SURE love to hear your secrets! For now, the good news for me is that hard part about doing my taxes this year is done--Oh happy day!



Please drop and line and share your most and least favorites and any tips you'd like to add!  I love hearing from you!

~Sharyl

******
Images:
Photograph of Light Tent by Sharyl
Clip art:   wpclipart.com

******


Saturday, January 11, 2014

Art Bead Scene Inspires me Again!

Those of you who have been with me for a while, know that for a long while I regularly entered the monthly challenges from Art Bead Scene.   I found such inspiration in the selected art pieces, and the challenges pushed me to do my best jewelry designing using artisan-made beads. 


July 2013 entry

A few months ago, I put myself on a "challenge break."  Too many things happening at once as holidays approached, and I felt like I was not being as creative at it anymore.   In the last year, I've also turned my attention more and more to making metal components, and in the last few months have gotten busy with polymer clay.   

Beads alone cannot be entered into Art Bead Scene challenges, only jewelry made with art beads.   But last month I found myself working and working on a pendant for this piece of art: 


Winter Landscape by Wassily Kandinsky, 1909 


Trivia:   I made the windows using a tiny metal stamp that says "HOPE."

The pendant turned out to be more of an education than a work of art, so I didn't turn it into a necklace.  I'm still really glad I did it.

When I looked at the artwork for the January 2014 ABS Challenge...


Textile Design for Cretonne, 1928? by Lois Mailou Jones


I was inspired all over again!   But not to do jewelry design. Suddenly it gave me all kinds of ideas for beads and components, and I decided to try out more techniques with polymer clay...and make a few altered metal pieces which I have been neglecting.   

I've had great fun and finally finished and listed them in my Sharyl's Jewelry Artfire studio.   I wanted to share a few of them with you!


Some of the polymer pieces were made using molds, a first for me.  Leaves are the main theme, but you'll find a few flowers too!     Others are free-form beads with colors or shapes that seemed to fit the art this month.    I used a lot of metallic acrylic paint on these, and added mica powders to some for a raku look.   


There are also what I'm calling "donut" beads in coordinating colors for many of these.  

And I was in such a mood to make leaves, I made some altered brass components in several sizes and styles.


You'll find these and more in my store.   I hope you will go take a browse and see what's new since you last looked!   Window-shopping is perfectly acceptable!   

If anyone does make a piece using my beads, please let me know!   I would love to feature your work here on my blog and also on my Pinterest page! 

Hope some of you will join the ABS challenges.  My thanks to all the people who make that web site possible!   I find it challenging whether I'm designing jewelry or not!    

Sharyl


Monday, December 16, 2013

Playing with Polymer Clay!

Recent polymer pendant I made.

Between holidays, giveaways, and sales... challenges and blog hops... special events (mine and others)...,  it seems like FOREVER since I've just written a blog entry about jewelry-making, pure and simple.  Well, I have so many blog topics to catch up on, it may take me a while, but today, I thought I'd bring you up-to-date on what I've been doing with POLYMER CLAY.
   
Some of my metal bails, recently sent to the
 Emporium of Impossible Things in Canada.

Yes, I know, METALS were my thing!   And yes, they still are!  But I started experimenting with polymer, not really expecting to like it much.  (It's like PLASTIC, for heaven's sake, and that still bugs me!)  But I confess, I'm rather hooked!   

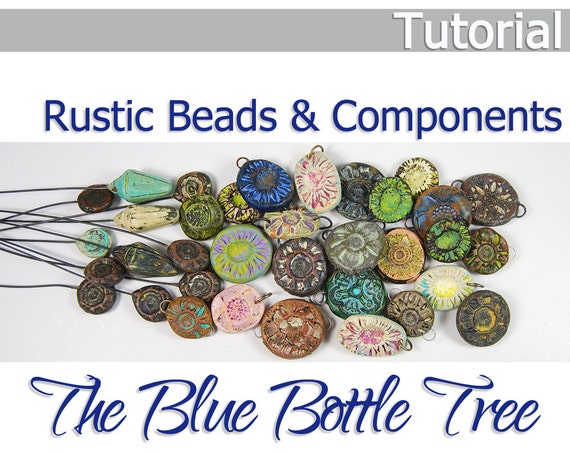
It all started when I read on Facebook about people making some wonderful looking beads and indicating they had used a tutorial by Ginger Davis Allman  of "The Blue Bottle Tree" on Etsy.

Tutorial Rustic Beads and Components from Polymer Clay Project Fimo- Boho Distressed


Tutorial Rustic Beads and Components from Polymer Clay Project Fimo- Boho Distressed

For some reason, I never thought I liked polymer clay beads until I saw these.  These looked like pottery to me.   They were "my style!"  And I loved them!   So I bought the tutorial and gave it a try.   
A bead from the first batch


Like everything I do though, I want to skip from beginner to expert mode in a flash and skip all the stuff that comes in-between. Instead, it seems like a long, hard road, with plenty of "flops." Isn't that just the way with learning any new skill or art though?  

IN THE BEGINNING: 
WONKY BEADS 

Sometimes, I can't decide if the pieces are really flops or just not my style.   I may like the colors, but not the shapes.  Or the shapes, but not the color.   


These are some of the first pendants I made.  I find them terribly "wonky" and I'll say so right out.  One brave soul suggested I might try making these a bit thinner, and that made a world of difference.  Thanks for that tip!  My thicknesses were not all all even either, and I'm learning to regulate the thickness of the clay a little better since I started, but still struggle.  

I used to have a terrible time trying to move the piece from my work surface to my baking surface, and finally read that the way around that was to put a bit of parchment paper down when preparing the bead, then transfer the bead, paper and all, to the baking pan.   (That was a "palm on forehead" moment!)

MOVING ALONG: 

WINTER HOLIDAY: 

My fun with polymer coincided nicely with the holidays!  I started making "sugar cookie" ornaments...


These all went into the WINTER HOLIDAY JEWELRY & ORNAMENTS section!
There are more!  Check them out!


I started a "Polymer Clay Beads" section for beads and pendants.   Some were holiday-themed.  Others not.


PRACTICE MAKES... BETTER?

Now that I'm hooked, I'm reading books and finding inspiration for polymer clay everywhere!  There are so many wonderful artists among us using this medium, and I just never noticed what they were using!   I'm in awe of them!

I'm trying a few slightly more advanced techniques, blending clay colors, making designs in the clay before baking, adding texture, expanding color options.   I'm starting to like what I see a bit more, but know I have so far to travel yet!


LATEST WORKS:
MIXING MY LOVES!

My most recent concept is to combine my metal work and polymer clay.  This purple was one of my first two pieces. 


Once I knew it would work, I tried more! 


You'll find these in a section called "Mixed Polymer and Metal"


AND NOW:   TIME FOR A SALE!

Well, as you can imagine,
several months and many pieces later, 
I've collected so many beads and ornaments,
my store is full to the brim!

What a good time to have... 

A SUPER POLYMER CLAY SALE!


Use coupon code SUPERPOLY to get 40% OFF in these sections:
These will appear at regular price with a "COUPON" flag in the bottom right corner of the item photo.  The discount will appear at checkout when you enter the coupon code.

Please Note:  Reduction on polymer ornaments in the "HOLIDAY" section have already been taken. The price you see is the 40% off sale price.  No code needed.  They will have a "SALE" flag in the bottom right corner of the item photo.  

Thanks for taking a look!    

* * * * * * * * * * 

Wonder where I'll head next?!  


--Do YOU work with polymer clay?   --Would you like to?   Leave us a comment!   --Link us to a photo of your work...or your store!   --If you have helpful suggestions or comments, please leave those too!  


 --If not, tell us what you ARE exploring these days!  We'd love to hear that also! 

 Thanks and Happy Holidays!
~Sharyl
 * * * * * * * * *

Thursday, November 28, 2013

Giving Thanks for the Unexpected

--->  News about Thanksgiving Holiday Sale at bottom!  

This year, I'm giving thanks for things new... for surprises.... for things that didn't turn out as planned.   I'm giving thanks for goals unmet, for they left room for other unexpected good things to happen!

I didn't plan to take this photo.  My finger snapped with the camera by my side.  I'm honestly not sure what is in the photo.  It doesn't look like anything in my workroom, but it was taken there.  When I realized I had snapped it, I planned to delete it.  


But right before I hit delete, my eyes saw the photo, and I was immediately attracted to colors, the movement, the light. And for some reason, I loved it, and realized it might be better than any of the carefully-planned photos I had taken today, more eye-catching, more inspiring, more emotionally moving.    

That pretty much sums up my year.   I tried to keep my business going, and have, but didn't write on my blog as much as I normally would... I haven't kept up with email or Facebook as well as I should have.   At the start of the year, I planned to expand my business by getting out to more events and focusing on marketing.  And while I made some small steps, I didn't do any of that in a big way.    However, I surprised myself by suddenly becoming interested in polymer clay.   Some of my goals for the year I've exceeded. Some have gone by the wayside as I focused on different and new projects.   

Sometimes I whine and everyone knows about my little problems.   Sometimes I have a big problem and keep quite about it.   Not because I'm noble or brave, but because I'm not and can't face talking about it much.   We all have our different ways.   


The simple truth is, part way through the year, one of my unexpected  "projects" became taking care of myself in a way I never had before.   When people would say, "You're as young as you feel," I found it terribly depressing.   I felt like I was in my late 90s (and I'm not talking about those spry 90-year-old types), when I was younger than that by many a year.   I walked stooped over, couldn't stand up straight, could barely get out of a chair or roll over in bed.  Walking down the hallway at home, much less grocery shopping, had become incredibly painful. I gave up going up and down stairs.  I stopped leaving the house much at all.   I needed a driver.  I only went to doctor appointments.    

It took some very good, very devoted doctors, months of physical therapy, water therapy, and now yoga too, but I am thankful to say, I can walk upright again!    I can have entire days, even several in a row, when I don't cry or yell out in pain.  I can drive myself places again and do light shopping.   Did I mention I can walk upright?!  :-)   I don't take that for granted at all.   I have little set backs all the time, but I'm full of joy just walking through the house, down a sidewalk, going to the pool to exercise, going to yoga class even though I can't do 1/4 of the moves!  I feel myself getting stronger, and for that, I'm completely, utterly surprised, thankful, and full of hope and joy!


Now I'm thankful for many other things, but I've "confessed" enough here for one day!  Please know I'm always grateful for you, my friends, for sharing this pursuit and joy of artful jewelry making with me and each other!

Wishing each of you a very healthy, safe, and joyful Thanksgiving holiday!  May you have much to be thankful for this year too!  And may every detour bring you closer to something better!

~Sharyl    

**************

(Believe it or not, it was one of these photographs below I was about to take when I shot the first one above!)

BIG SALE of the Year! 
25% off EVERYTHING
THANKSGIVING SALE now through Mon, Dec. 2! 
Use code at checkout: 
THANKS25


Check out my new ornaments 
in the Winter Holiday section! 
Lots of jewelry too!   


--Jewelry to wear for the holidays and
--jewelry for gift-giving!
--Metal components and 
--polymer clay beads 
for those who create jewelry for others!
All handmade, OOAK by Sharyl!

~Browsing is always free!~
Thanks for shopping handmade!

***********


Friday, October 4, 2013

Polymer Clay--Take 1!


A couple of months ago, I was following a conversation on Facebook, and saw people showing photos of polymer clay beads they had learned to make following a tutorial, 
"Rustic Beads and Components from Polymer Clay Project Fimo- Boho Distressed" written by Ginger Davis Allman of TheBlueBottleTree


Tutorial Rustic Beads and Components from Polymer Clay Project Fimo- Boho Distressed
Photo from The Blue Bottle Tree store on Etsy.

I never thought I wanted to make polymer clay beads, but these really appealed to me!   I bought the tutorial from Ginger's store, purchased the items I needed, but got off to a very slow start.  First, "real life" kept getting in my way.  Then,  I started reading more about polymer clay, much of it conflicting, and was unsure how to begin.  Until last night, I finally just waded in and gave it a try!


So here are my first 8 beads.  
And yes, they are a bit wonky!   

I just experimented with techniques and tried to get the hang of it.   The top two I made holes in the top, the bottom ones have holes running through the beads.  While the hole in the upper left looked huge, and I was just having some fun with those, they actually turned out the right size!  (What I learned:     Use larger holes!)

My trimming around the beads could have used some improvement, but I filed them as smooth as I could after baking.   Still, they didn't turn out very well shaped.  I'm not completely sure how to improve that.  (Suggestions?   Maybe laying them flat rather than on the skewers? Would their design go flat if I did that?)


After I made the beads, I baked them according to the directions, then I painted them.   Had I not looked back at the directions at the point to read up on sealing options, I would have missed the step that instructed me to bake again after painting!   (What I learned:  Must bake after painting!)


After they cooled, I experimented with different types of sealants.  Some of my sealants had color, some were clear.  The color of my clay was a light gray.  I had purchased more colorful clays too but thought I would start with this one.  I don't think I applied enough layers of color--paint or color sealant.  They look more transparent than opaque.  (What I learned:     Need more color!)


Well, as I said before, they look a bit "wonky" but I wasn't aiming for perfection.  I was "pleased enough" with my first 8 beads!    I did wonder if I had anything "usable" here.   What do you think?   

I thought about it a bit, and finally decided to use a few of them, just for fun.    This first piece, I think would have to be for me only, wearing at home with a pair of jeans!     It's not a "show piece"  (or a "show off" piece), but it will be a fun remembrance.


I'm a little happier with the pair of earrings that follow. Those long beads are "mood beads," and I think these are just a whimsical mix of colors and textures, so I can get away with my first-try wonky blue beads!  


For anyone interested in learning more about polymer clay, I encourage you to:

1) tune into Kashmira Patel's blog, Sadafulee...Always in Bloom! where there has been an ongoing sharing recently about how to get started with polymer clay.   There are beginners there, but also experts sharing, and it's very helpful and inspiring!   

2) purchase one or more of Ginger's tutorials on polymer clay.  I bought the one on rustic-looking beads, but there are many others!  

3) go to YouTube and watch videos, read blogs, follow discussions on Creative Bead Chat, Artisian Whimsy, and other web opportunities for learning.  (And remember, your local library is another good source for information!)

Thanks for joining me for the first look at my polymer clay beads!   Hopefully I'll have more to show you as time goes on, and my skills will greatly improve!   Please, share your experience working with this medium!  

~Sharyl

*********************


Wednesday, September 18, 2013

"Creating with Cabochons" Blog Hop Reveal!

When I saw that Sally Russick of The Studio Sublime was hosting a blog hop on "Creating with Cabochons," I'll admit that my attention was grabbed but my reaction torn. Should I run toward the fire or run away from it? I've been avoiding cabochons since I started making jewelry.  I'm thinking in particular of setting stones in silver bezels.   I see people who do it very well, and some who don't. I watched a video some months back where the instructor seemed to struggle a great deal with it. That didn't make me leap to try it.


I know I'm not ready for that,...but, I've had another idea I've wanted to try for a very long while now, and this gave me the perfect little push to try it out.  So I signed up and gave it a try!  

Not only have I had this idea in my head for nearly a year now, I've had the piece I wanted to use for almost as long. It's not a stone or ceramic piece though.  It's a wooden tile art piece from "More Skye Jewels" (temporarily closed) that I asked Marie-Noel Voyer-Cramp NOT to drill a hole in.  This was a departure for me.  Typically I ask for holes in her art tiles, tell her how many, and the placement.  This time I was brave and daring!    (I hope you can envision me in a cape and mask with hands on hips!)

I should have thought to take a "before" photo, but alas...


I was finished with it before I thought to take a picture.   I was slow to join the "key" movement, but really liked the colors in this tile and the simplicity of the piece.  The placement of the key image on the wooden tile seemed perfect for my experiment in framing it with metal.  I cut it all freehand so as to hold the tile in place and avoid covering the main key image with my metal "flaps."

It looks pretty "rugged" and it is.

I had a sort of steampunk image in mind all along.   I cut the frame out of aluminum.   (I had planned to use copper, but this aluminum seemed just the right gauge.)  After filing all the edges, I gave it a worn, industrial look by beating the metal up with stamped letters and a ball pein hammer.   


There is a built-in bail which I made by leaving a longer piece of metal on top and rolling it from back to front.  I bent the sides to frame the tile, then bent back enough to remove the tile so I could paint the metal frame.   I mixed green and black patina to come up with this dark grayish color, and applied several coats, then a sealant.  


I wasn't using a torch to anneal the metal though, (don't even know if you can anneal aluminum like you can copper)...so although it remained fairly flexible, I didn't want to over bend and break it.  I had trouble getting the flaps to remain flat against the tile.

With the blackened brass chain, I like the overall look of this, but think it needs to be redone, and didn't have the time or heart to start over right after I finished this attempt.   Preferring not to damage the wooden tile, I did not continue trying to flatten the flaps once it seemed it wasn't going to work using the tools I currently have.  I did have plans for finishing the necklace using some miniature black keys and some jasper beads that nicely complement the colors of the tile.  


Forgive me for not completing my work.  I decided against finishing my piece as is.

I learned a lot from doing this, and want to try again, hopefully with better results the next time!  (In addition to doing a better job with the metal frame, I think it needs something at the bottom to hang dangles from, including the miniature key charms!) If anyone has other suggestions for me, please include in the comments.  This did not end up as a "masterpiece" to show off, but turned out to be a real learning experience and work-in-progress.  I'd like to learn more from you about how to improve it!  

Many thanks!

~Sharyl

You've seen my example that didn't work so well, be sure to visit the others in the "Creating with Cabochons" Blog Hop.  There are sure to be some excellent examples there. I'm eager to see them myself!  

Our Host:  Sally Russick

D Lynne  Bowland
Alicia Marinache           
Lynn  Jobber           
Jenny Davies-Reazor           
Jo-Ann  Woolverton           
Marde Lowe           
Dawn Doucette           
Mary K McGraw           
Gloria Allen           

Cheri  Reed           
Sonya Stille           
Elizabeth Owens Dwy           
Veralynne   Malone           
Tania Hagen           
Lynsey  Brooks           
Christina Miles           
Holly  Westfall           
Kathy  Lindemer           
Patti Vanderbloemen           

Therese Frank           
Adrienne Berry           
Liz   E 
Tanty  Sri Hartanti           
Ginger Bishop
Renetha Stanziano           
Marlene  Cupo           
Sandi Volpe           
Sharyl McMillian-Nelson           <---You are here!
Niky  Sayers

Mischelle Fanucchi           
Tracy  Stillman           
Skylar Bre'z           
Ann Schroeder           
Paula Kramer
Jess Green           
Susan Kennedy           
Stacie  Florer           
Cathie  Carroll           
Susan F.  


Michelle Caballero       
Sabine Dittrich           
Kristina Johansson           
Kimberly Sturrup-Roberts           
Melissa  Meman           
Cheryl McCloud         
Michelle  Timms           
Cindy  Pack           
Lynda  Carson

Cynthia  Machata           
Julia  Harris           
Karin  Slaton
Ingrid  Anderson           
Karin Grosset Grange
Jasvanti  Patel  
Inge  von Roos
Molly Alexander


* * * * * * * * * * * * * *