Showing posts with label techniques. Show all posts

Monday, December 16, 2013

Playing with Polymer Clay!

Recent polymer pendant I made.

Between holidays, giveaways, and sales... challenges and blog hops... special events (mine and others)...,  it seems like FOREVER since I've just written a blog entry about jewelry-making, pure and simple.  Well, I have so many blog topics to catch up on, it may take me a while, but today, I thought I'd bring you up-to-date on what I've been doing with POLYMER CLAY.
   
Some of my metal bails, recently sent to the
 Emporium of Impossible Things in Canada.

Yes, I know, METALS were my thing!   And yes, they still are!  But I started experimenting with polymer, not really expecting to like it much.  (It's like PLASTIC, for heaven's sake, and that still bugs me!)  But I confess, I'm rather hooked!   

It all started when I read on Facebook about people making some wonderful looking beads and indicating they had used a tutorial by Ginger Davis Allman  of "The Blue Bottle Tree" on Etsy.
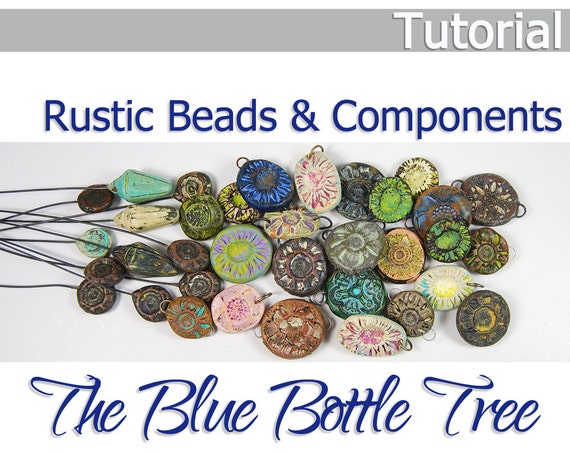
Tutorial Rustic Beads and Components from Polymer Clay Project Fimo- Boho Distressed


Tutorial Rustic Beads and Components from Polymer Clay Project Fimo- Boho Distressed

For some reason, I never thought I liked polymer clay beads until I saw these.  These looked like pottery to me.   They were "my style!"  And I loved them!   So I bought the tutorial and gave it a try.   
A bead from the first batch. 


Like everything I do though, I want to skip from beginner to expert mode in a flash and skip all the stuff that comes in-between. Instead, it seems like a long, hard road, with plenty of "flops." Isn't that just the way with learning any new skill or art though?  

IN THE BEGINNING: 
WONKY BEADS 

Sometimes, I can't decide if the pieces are really flops or just not my style.   I may like the colors, but not the shapes.  Or the shapes, but not the color.   


These are some of the first pendants I made.  I find them terribly "wonky" and I'll say so right out.  One brave soul suggested I might try making these a bit thinner, and that made a world of difference.  Thanks for that tip!  My thicknesses were not all all even either, and I'm learning to regulate the thickness of the clay a little better since I started, but still struggle.  

I used to have a terrible time trying to move the piece from my work surface to my baking surface, and finally read that the way around that was to put a bit of parchment paper down when preparing the bead, then transfer the bead, paper and all, to the baking pan.   (That was a "palm on forehead" moment!)

MOVING ALONG: 

WINTER HOLIDAY: 

My fun with polymer coincided nicely with the holidays!  I started making "sugar cookie" ornaments...


These all went into the WINTER HOLIDAY JEWELRY & ORNAMENTS section!
There are more!  Check them out!


I started a "Polymer Clay Beads" section for beads and pendants.   Some were holiday-themed.  Others not.


PRACTICE MAKES... BETTER?

Now that I'm hooked, I'm reading books and finding inspiration for polymer clay everywhere!  There are so many wonderful artists among us using this medium, and I just never noticed what they were using!   I'm in awe of them!

I'm trying a few slightly more advanced techniques, blending clay colors, making designs in the clay before baking, adding texture, expanding color options.   I'm starting to like what I see a bit more, but know I have so far to travel yet!


LATEST WORKS:
MIXING MY LOVES!

My most recent concept is to combine my metal work and polymer clay.  This purple was one of my first two pieces. 


Once I knew it would work, I tried more! 


You'll find these in a section called "Mixed Polymer and Metal"


AND NOW:   TIME FOR A SALE!

Well, as you can imagine,
several months and many pieces later, 
I've collected so many beads and ornaments,
my store is full to the brim!

What a good time to have... 

A SUPER POLYMER CLAY SALE!


Use coupon code SUPERPOLY to get 40% OFF in these sections:
These will appear at regular price with a "COUPON" flag in the bottom right corner of the item photo.  The discount will appear at checkout when you enter the coupon code.

Please Note:  Reduction on polymer ornaments in the "HOLIDAY" section have already been taken. The price you see is the 40% off sale price.  No code needed.  They will have a "SALE" flag in the bottom right corner of the item photo.  

Thanks for taking a look!    

* * * * * * * * * * 

Wonder where I'll head next?!  


--Do YOU work with polymer clay?   --Would you like to?   Leave us a comment!   --Link us to a photo of your work...or your store!   --If you have helpful suggestions or comments, please leave those too!  


 --If not, tell us what you ARE exploring these days!  We'd love to hear that also! 

 Thanks and Happy Holidays!
~Sharyl
 * * * * * * * * *

Sunday, July 7, 2013

Independence Day Sale, Store Update, Metal Questions


Sale Reminder:

Today is the last day of the Independence Day Sale at Sharyl's Jewelry!  (Although it's possible the coupon code will still last through part of Monday.   It's good while it lasts!)     

Use this coupon code at checkout:   

INDEPENDENCE15 
to get 15% off all items in the store!


Store Update:

Hope you've had a good holiday!   I've been working on more new jewelry and handmade components.   Unfortunately, they will not be ready right away.  The jewelry pieces I have ready still need to be photographed. Some are for special projects and can't be shown yet.  And the components are in their early stages:   I'm still preparing the metal.   I recently purchased 5 new embossing folders, and I'm anxious to use them!  First, though, a few kinks to work out of the system.  Please read below!  


Metal Questions:

I often get asked questions about metal work and supplies, even though I've only been at this work for about a year.   I've been happy to share what I know, but today is turnaround time.   I have some questions  and hope some of you may have some suggestions for me!

1)  I continue to have the hardest time finding a good supplier of copper sheet metal.   My local hardware store worked well for quite a while, and offered it in packages at a fairly reasonable rate (less expensive than I could find it online, and I like to buy local even though it's a chain).  It was also handy to be able to go just a few blocks away and pick up a few sheets when I needed it.   However, over the last 6 months or so, they've stopped carrying it consistently. I can order it and they'll get it in. Then I have to coordinate a time to get it between when the shipment comes in and before it goes out on the shelf, but without them holding it for me.  (???)  I'm sure if we do this a few more times, we'll get the process down so it goes more smoothly.  It takes a couple of weeks for the shipment to arrive, so it's not handy if I've let my supply get too low.   They have the nicest staff and are very nice to arrange the order, but I need something faster and more convenient.  

I found another source online that offered even better prices, but didn't take PayPal unless you called ahead and made special arrangements.   Months later, I still haven't remembered to do that.   I need something I can go to, order, and have it be delivered through the mail.   And of course, at the best rate possible.   

Any ideas for me?   

2)  I've been using a sealant with my color patinas I was very happy with, but recently it seems rather sticky/gooey when it should be dry.   I've made several items with this result and so I'm not applying any more from this bottle.  (I'll strip the pieces to the bare metal and redo them.) The bottle is about 1/2 full/empty.   I've shaken it well each time I've used it, but perhaps it is just what happens after a while?

I'm trying to quickly decide whether to buy another bottle of the same  or try something new.  I know some have had good luck with aerosol sealants, but I'm not supposed to use those.   Do you have sealants you like that work well with color patina products?   Renaissance Wax seems to make the color disappear.    It works very well with copper that has been darkened.    What I have been using with color is a Vintaj liquid product.   I will contact Vintaj and/or sellers of their products to see if they have suggestions.  I'm not trying to diss them.   I've been very happy with their product until very recently, and maybe it's just time I get a new bottle. Still, I would welcome your thoughts and suggestions about other products too!


**Customers, please note:    

  • I don't believe I've sold any metal components that were defective, with the sealant in this gooey state, but if you feel you have purchased components from me with this problem, I would greatly appreciate it if you would contact me  directly immediately.
  • (Contacting me through the Sharyl's Jewelry store on ArtFire will be the best way to reach me.  Use the "Contact Seller" link on the main page.)   
  •  I have always tried to make sure components are dry and the sealant hardened before they go in the packages to be mailed.  I typically wait 24 hours after the last coat of sealant to wrap, but 12 hours minimum.   **


Thanks to you all for your help and advice!    Hope you've had a good holiday!

~Sharyl

******************************


Sunday, May 5, 2013

1 question survey + tip about Monday's special event!

I have a quick survey for you  today!   I would greatly appreciate your feedback.   I'm starting to do some paid marketing and trying to decide how/where my time and money are best spent.  You can help me with your input!    (There is only one question and it's multiple choice, so it's really quick!)

Click here to take survey 

If you have any comments from your own experiences about marketing and paid advertisements, please send me a note or include in the comment section.  I'll be very grateful!

Also, please check in tomorrow!   I was one of the "5x5 Tester Group" in the May 2013 issue of Artisan Whimsy Bead Chat Magazine  and the results have been published!  (Pages 21-26 if you want a sneak peak!)  You can click below...


I'll show you more details on how the metal pieces arrived, what I did to them, and used them in my designs!   We all had a great time, and hope you will enjoy our mini blog hop Monday!

I'll give away one of the pieces to one of our blog participants, so come back for details!
-----------------------------------

Graphic Credits:

http://www.wpclipart.com/signs_symbol/checkmarks/checkmarks_3/.cache/checkbox_checked.png

http://www.wpclipart.com/education/kids/students/.cache/student_writing.png

Bead Chat magazine copyrighted by Melinda Orr. 2013
----------------------------------------


Friday, March 8, 2013

"Sand and Sea Blog Hop" Reveal!

Lisa Lodge, from the blog,  "A Grateful Artist"  and store, "Pine Ridge Treasures" on Zibbet, is hosting:


I'm so excited to be a part of it!

For this event, Lisa sent me a bag full of interesting beads in "sand shades," (brown, copper, and tan tones).  Even though the event was several months away at the time, I couldn't resist dumping them out on the table as soon as they arrived to see what was there!   I planned to put them right back into the bag for a bit, but couldn't wait 5 minutes to begin sorting them and planning what I would do!


These were the ones I first sorted from the larger bag
as inspiration for my design.
I used a good portion of the other beads too,
but these were the ones I designed around.

As recommended in the guidelines,
I did not purchase anything new for my creation.

I only added a few beads I already had:
A handmade-button the color of sand 
with a wonderful wavy pattern from
 Linda Belinda on Etsy.
Mykonos Greek beads from
 Linden Avenue Designs on Etsy.

These, a sprinkling of pale blue glass beads, 
and a few hardware store washers I had on hand,
were the only items I added from my collection.  I made my own clasp from copper wire.


Even though my color was "sand," I couldn't resist adding a tiny bit of blue for water.   (I got the idea from a couple of the crystals Lisa included in my bag that were brown with a bluish finish.)  

As we all know, sand can come in many shades, and you can see some of the variety in the beads Lisa sent and in the button I added.  


I just loved the rectangular coral-color bead.  The white swirl beads and long slender bead reminded me of both waves and the most beautiful white sandy beaches!


This irregular shaped bead I found in the bag
was a real favorite too.
It looks like stone to me,
but I suppose it could be some type of clay bead.

I've never been able to wrap a briolette to my satisfaction,
but was determined to use this one from Lisa
as part of the focal dangle!
Luckily, the wire work on this piece
is not "fussy" or "perfect." 
It's "relaxed beach style!" 


Lisa also sent some thin wire sort of a
 burnt orange color.  
 I couldn't imagine what I would do with it
until I was nearly finished.  
 I ended up twisting it around some lose beading wire
in several areas, and I really liked 
the bit of color it added in those spots!  
The wire took me from "goof" to "accent" in no time at all!  
I think I'll need to buy some of this for future designs!


Thank you for visiting my page! 

Please take a look at the others who are participating:


ELEANOR BURIAN-MOHR, THE CHARMED LIFE

MARY GOVAARS, MLH JEWELRY DESIGNS

TANYA GOODWIN, A WORK IN PROGRESS

KATHY LINDEMER, BAY MOON DESIGN

TOLTEC JEWELS, JEWEL SCHOOL FRIENDS


SHARYL MCMILLIAN-NELSON, SHARYL'S JEWELRY     <---YOu are here!

MARLA GIBSON, SPICE BOX DESIGNS

MELISSA TRUDINGER, BEAD RECIPES

DOT LEWALLEN, SPEEDIE BEADIE

EMA KILROY, EMA K DESIGNS


KIM BOOTH, THE PINK MARTINI BOUTIQUE

JAMI SHIPP, CELEBRATING LIFE

LEAH TEES, MY BEADY LITTLEEYES

CHRISTIE MURROW, CHARIS DESIGNS JEWELRY

MONIQUE URQUHART, A HALF BAKED NOTION


GLORIA ALLEN, GLORIA ALLEN DESIGNS

CINDY ANDERSON WILSON, IT'S MY SEA OF DREAMS

SUZI CAMPBELL, SUZI CAMPBELL CREATIONS

SHAIHA WILLIAMS, SHAIHA'S RAMBLINGS

ANNETTE RIVERS, MAMA OWL'S MESS


A special thanks to Lisa for organizing
and hosting this event! 
If you have any trouble linking to the participant sites,

~Sharyl


* * * * * * * * * * * * * * * *


Tuesday, January 29, 2013

ABS Jan 2013 Challenge


(Looking for the Give-away?  Please CLICK HERE!)


Black Peacocks with Japanese Persimmons
Jessie Arms Botke, 1940
Oil and Gold Leaf on Panel
32 x 40 inches

(Please note this art is copyrighted and is to be used only as inspiration.)
For more information on the work of art, please visit the 
Art Bead Scene Blog.


I began my design with this lovely handmade pottery cuff bead by Cindy Kovar that I've saved for the longest time.     The teal color and design on the cuff reminded me of the peacock tails in the Borke painting, so it seemed the time was right to finally use the cuff.
Handmade Pottery Cuff Bead 
by Cindy Kovar,
"Captured Moments" on Etsy

I added beads on each side.  Teal-colored Czech glass crystals, brass beads, and persimmon-colored freshwater pearls are all wrapped up in copper wire with a handmade copper clasp to fasten the bracelet.   These represent not only the Japanese persimmons hanging from the tree in the painting, but also the colors found in the peacock feathers.


I braided hand-ripped strips from three different raku-printed fabrics  to get the look of peacock feathers and to pick up other colors in the painting, then used brass ribbon clamps to finish the ends.


There will be a Blog Tour on Thursday, Jan. 31, 2013
on the Art Bead Scene page. 
I hope you will click this link
and join in a tour of all the designers works!


Thank you to Cindy for such a lovely piece to work with and thanks to all of you for stopping by!

Sharyl ~ Sharyl's Jewelry


**P.S. Looking for the give-away?   Please CLICK HERE!**


Wednesday, January 2, 2013

Comments, Raw Brass, and Goldilocks...

I love hearing from you all and reading your comments.  I was recently flattered that Shirley Moore, author of the  "Beads and Bread" Blog, made this comment on my last post:  "I wish I could've seen that brass flower before you started, I bet it was such a huge contrast...."


Well, it just so happens that the raw brass flower pendant came from a packet of 4, and was the first one I tried.  

So thanks for speaking up, Shirley!  Here is a comparison photo for you and anyone else who is interested!


** Does anyone have color suggestions 
for the other 3 flowers?! **


I should do more of showing my works in progress.  
I did take these two as I was making the necklace:

I was planning to add some black stone beads, 
but decided it seemed too crowded.

Then I played with omitting the red beads, 
but decided they should go in!  
It was a bit like 
"Goldilocks and the Three Bears."
There was a lot of experimenting 
to get to the feel of
"just right!"


The necklace was done for the Art Bead Scene Dec 2012 challenge.  You can click here to take a look and read more about it if you missed my last post.

You may also want to take a look at the ABS Blog Tour for this event that was prepared by Erin Prais-Hintz of Tesori Trovati.   You'll be able to quickly see all the fantastic entries and read a brief description.   I think we were all duly inspired by this piece of art! 

Sleeping Beauty by Erté, 1983
I want to thank all of you who have taken the time to join and read my blog this year, those who have left comments and suggestions, participated in give-aways and challenges, and shared in so many ways!  It means so much to me that you are here!

Happy New Year 2013 to each of you!  I'm excited for this new year and sharing it with you!

~Sharyl


(Reminder:   Jan. 2 is last day of holiday sale!  
Components are included!)

****************************


Tuesday, August 21, 2012

Art Jewelry Elements Blog Hop--Metals


"Everyone Starts Somewhere" Blog Hop -- Entry #11

Jennifer Cameron from the Art Jewelry Elements group blog asked that we consider a jewelry-related skill and show how far we've come over a period of time.    I was immediately reminded of the photography comparison I did last fall compared to photos I had taken the year before.   Oh my, my cheeks are still red from embarrassment.   (Do you remember?  If not, good!   I won't link them up to remind anyone!  ha!)    

And yet, I'm here now doing something similar all over again!    Last year, I decided I wanted to learn to make at least one type of jewelry component myself.   I thought it would be nice to say I had actually made some piece of my jewelry, and perhaps eventually be able to share what I would make with others.

I set as one of my goals for the year to explore various types of beads and components there are, see what might be a good fit for me, then give it a try.   I wasn't even very hard on myself.  When I first started making my own earring pieces I was suddenly prouder of my jewelry.   Just a little thing, but I had made that part myself.   I kept reading and exploring...

One day Melinda Orr started talking about working with metals.   I started listening to every word.  And before you know it, I was watching videos and buying tools and copper and brass and embossing equipment, patinas, and more.  I'm loving it!  

I'm still new to metal work, and want to learn so much more, but I've learned a few things since I started!    For example, this was an early piece I posted in the Spring asking for help...


Do you see what is wrong here?  I knew I had a problem, but was totally appalled when I saw the photo enlarged on the screen in Facebook.  Never mind that the metals aren't evenly bent.

Look at those Razor-sharp edges!  I did have the notion I should round off the pointed corners, but wasn't filing the edges properly.  I had designed jewelry that could be used as weapons!    

The usual helpful, in-the-know folks on the Creative Bead Chat Facebook group set me straight right away.  Thank you!  There have been other times like this, but enough with the stories, and on with the photos!

Early lessons: I learned to properly file the edges, and to use a grinder/buffer on larger pieces.


 An etched, hammered and shaped piece for a pendant--
far from perfect, but an improvement.

I began doing more embossing and using various color techniques with the metals: 


Brass earring dangles I embossed and colored with patinas.

And more playing with patinas:

Earring Dangles

Bracelet cuff


Efforts to shape metals:


Bails that won't stay closed...


Bails that do stay closed...They even look better this way!


Lesson from today... Liver of Sulphur.  


A new bail.
(Never dreamed it would get this dark this quickly! 
It was only in the solution a moment!)
I haven't wire-wrapped this one yet, obviously.

More examples from the "dip" today:
 Needs more practice.
I made them dark, I made them lighter again.
These can be on the next "when I was new" list!

Now, to see more before/after skills, 
we'll return to the "Everyone Starts Somewhere" edition of the....


Thanks for visiting!

Sharyl ~  Sharyl's Jewelry
...Or click to see more 

* * * * * *