Showing posts with label pearls. Show all posts

Saturday, January 3, 2015

Looking back on blogging, looking forward...


Looking back at blogging...

My very first blog entry was June 16, 2011:  "Jewelry Design - My "Unique" Philosophy."  

When I look back at that entry, every bit of what I wrote was true then, and true now.   So much has changed, but my vision of what I wanted to accomplish with jewelry design is exactly the same as when I started.   I find that rather remarkable. 


Not all my early blog posts were something I'd still be proud of.   I was very "green" and feel a bit horrified about how I spoke with authority about things I didn't know enough about.   My photographs were terrible. (It took me 6 months to take a remotely decent photo!  I blogged about that on Jan. 14 and Jan. 18, 2012. Many of my blog posts in the first year focused on photography practice!)  


But to back up a bit, as I recall, I had no followers at all until I had blogged for about 6 weeks.   I just kept writing, hoping someone would appear.  And finally, it happened, one day, someone finally made the choice to "follow" my blog.  And about a week later, another, this time a young man from Russia.  I never forgot about him.   I was so thrilled to have these 2 pay attention to what I wrote!   And eventually more came, and when I hit 10, I felt I had finally "arrived!"  ha!  

In the early days, I greeted each new member with a welcome paragraph!   Eventually, it became impossible.   Blog hops would bring new members in larger numbers all at once, I couldn't keep up.  What a shame about that.  My blog membership numbers are still not stunning, but they've been "hard-won" and I've always deeply valued each person following and sharing  your comments.  I always intended this to be a very interactive space.  


trend graphI must admit that in the first few years of blogging,  I was more creative in my writing, more engaging, and certainly more frequent.    The heavy use of Facebook to share ideas and new items, and the ever-increasing use of mobile technology to read messages seems to have shrunk blog participation and comments.   Posting messages and getting no response was disheartening, and I got to where I mostly posted about sales in my stores.   (Boring, and a self-fulfilling cycle which left little incentive to want to read my blog!)

Blogging today...

Recently, I announced that the blog had it's 175th member, and we celebrated that with a gift to the participant and a give-away winner.   I decided to briefly highlight those involved in that event on my blog today!

Val of Miss Val's Creations was the 175th member.  I wanted to show you these classy earrings I found in her store.   The ear wires are such a fantastic shape!
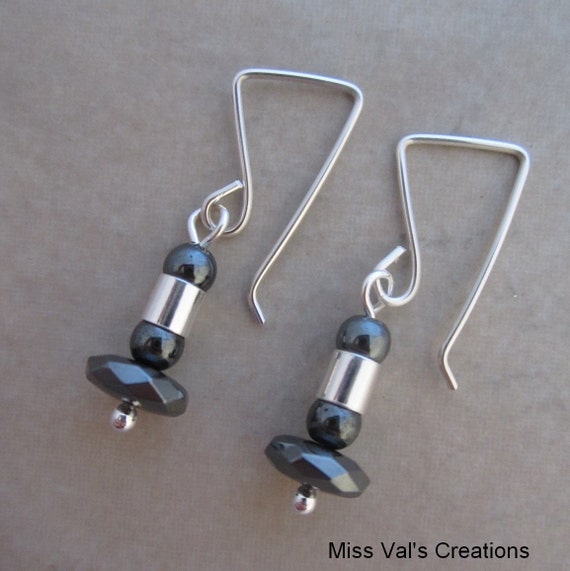
hematite sterling silver dangle earrings

hematite sterling silver dangle earrings


Catherine of Shadow Dog Designs won the random drawing.  Catherine's store is on  Artfire.  I think these pearls and the amazing pendant go perfectly together!
Handmade Tree Pendant Necklace Rustic Green Pearls Bali Beaded Jewelry


Since then, we've gained one more member.   And so, in the original spirit of this blog, I'd like to welcome our most recent follower, Meridy Migchelbrink of Two Trees Studio.   Among her always-impressive designing techniques, Meridy creates many of her earthy looking pieces using waxed Irish linen thread.  Take a peak:
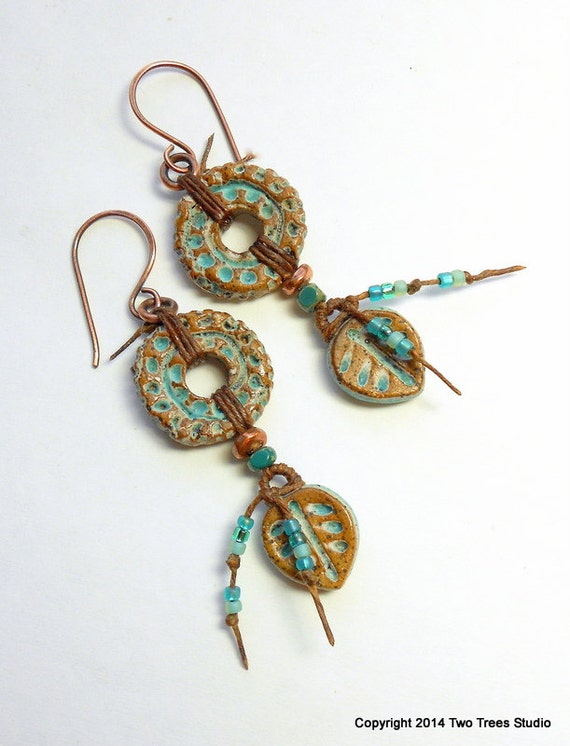
The Word for World Is Forest:  Petite, lightweight artisan ceramic earrings, with an earthy, rustic, foresty vibe

The Word for World Is Forest: Petite, lightweight artisan ceramic earrings, with an earthy, rustic, foresty vibe

Now that I've given you a small sample of each of these artist's work, I hope you'll go look at the rest of their collections!   I'm so honored to have these three jewelry artists, as well as all the rest of you talented people, following my blog!

Looking forward...

I hope you'll come around again!  I'm planning more features, focus sessions on other bead and jewelry designers, discussions on techniques, business matters, and more!   I'll be here, writing away, just like in the beginning, hoping someone drops in and leaves me a note!  

Wishing a very Happy New Year 2015 to all!  

Sharyl

P.S.  Just as I'm about to post this entry, I've received 2 pieces of good news to share today!  I'll hold it until next time.  Expect another post soon!  

******
Image Credits:

All jewelry photos taken by the jewelry artists are copyrighted and used here by permission.

Clipart is from wpclipart.com
******


Saturday, April 26, 2014

Pearls, Polymer, and the April Art Bead Scene Challenge!

Do you remember this "sneak peak" from my last blog post?   This will be the last of 3 items I made using glass pearls from Lisa Lodge's "Spring Pearl Challenge!"


The art from this month's Art Bead Scene challenge ...


Swaying Dancer (Dancer in Green), 1877-79
by Edgar Degas


...in particular, the dancer with black hair and her costume, inspired my polymer clay pendant for this piece.


I made the pendant from polymer clay 
and used a square rubber stamp I have. 
Then I cut it in an oval shape with a small
cookie-cutter type device.
I painted the center black
to match the dancer's hair
and the petals to match the dancer's costume--
 aqua acrylic paint (though it looks more blue here)
with copper mica powder on the edges.


Above the pendant are two lampwork beads
that remind me of the aqua color and shapes in the painting.
The rounded blue bead and
the green bicone bead are lampwork by EricaBeads.
There are also two sage-gray lampwork spacer beads just above those
in the bead strand.  Those were made by 
Serena Thomas of Taneres on Etsy.


You can get a glimpse of the green glass pearls here.
 I also used some of the synthetic sea glass Lisa Lodge sells.
There are blue and green Czech glass cathedral beads I purchased from MayaHoney.
Some of my "Funky Flat Poly Beads,"
bronze-looking glass seed beads, and more are also in this mix!
I also added a bit of multi-color (blue, aqua, brown)
hand-dyed silk ribbon with glitter edges
from Abby&Ellie as a nod to the swirl the ballerina skirts.

Handmade clasp by me.
I love these little bead caps, again reminiscent of the ballerina skirts.


Full view!


See other entries on the ABS Flickr page!  

Thank you to Art Bead Scene, Lisa Lodge, and the artists whose hand-make art beads were used in this necklace!  It's so nice when opportunities collide and something fun comes of it!  

Continued happy Spring to all!

Sharyl
**********************


Sunday, April 20, 2014

Lisa Lodge's Pearl Reveal!

Lisa Lodge of Pine Ridge Treasures, frequently hosts blog hops and design events with packets of beads she sells to participants.   I have participated in several of these and wish I could do more, but time forces me to pick and choose!   This time, I joined Lisa’s glass pearl event!
 
Lisa is good about sending the beads out far in advance,
but I'm not always as good about keeping track of things!
So I marked the envelope and put them in an obvious spot on my desk.
As I found things I was interested in using to go with the pearls,
I added them to the packet!
It was sooo easy!


There were a couple of color choices and I chose a pastel green.   Lisa sent several strands of pale green in 2 sizes and also some creamy white strands! 
There were many more!
This is what's left after making 3 pieces of jewelry!

My first thought was to make a multi-strand necklace, some with green, some with white.  I had made some pearl and crystal necklaces for my niece's wedding last summer (some of you are bound to recall that)!    I wanted to be sure I didn’t just recreate those patterns, but tried something new, so I thought on it a bit longer.   

 
White glass pearls from Lisa.
Gray matte glass beads from my collection.


I kept wishing I had some gray pearls too, but found some dark gray round matte Czech druk beads in my collection and they were a perfect size to match the white pearls.   My first thought was to make one size of a necklace in gray, the other side in white.  Could I pull that off?  Nope!   As with many of my best plans to create something symmetrical, I wandered away from my plan, but kept the colors very dark and dramatic for this piece.  I didn’t want a classic white-pearl  look (though you’ll see one of those later too)!   

I ended up using the gray glass beads, the white glass pearls Lisa sent, and adding black chain and findings.   I think this one may be my favorite of the 3 pieces made.   I admit though, I do struggle with getting multi-strand necklaces to lay properly, and I’d say I dismantled this piece around 8 times to get it to this state! 

Two blue-gray lampwork beads with necklace chain by
Lampwork by Amy.

Blue-gray and metallic bead above pendant by 
Jennifer Jennings of BlueSeraphim.
Gray flowered wreath by ____.*

*I'm having difficulty retrieving the artist's name who made this.  Help me please! 
 It's a lovely piece
and I know I'll recognize it when I hear it!  Thanks!


Next, I made a more classic white pearl design, stringing it with Swarovski glass bicone crystals in shades of blue and pink.  It reminds me of a white dress my mother once made me.  I couldn’t decide whether I wanted the ribbons and buttons to be pink or blue, so she ended up putting two rows of ribbon and alternating button colors.  I loved that dress and my sister loved it after I finished with it!   So, in honor of that special dress, there are both pink and blue crystals in alternating colors in this piece too!   Likewise, I added 2 small heart charms to the front.  


One was a pink crystal heart, the other an artisan-made ceramic one (pale blue on one side, green and yellow on the other).  Both were gifts with purchases and I liked their similar sizes but very different  textures.   


It started out to be a necklace, but I think I prefer it as a bracelet.  It will work either way!

I have one more to show using the green pearls, but I'm saving it for next time.  It will be my entry in the April Art Bead Scene challenge!   I'll give you a "sneak peak" though so you can see the green pearls!


To see the other entries in Lisa Lodge's Pearl event, visit this FaceBook page!  Lisa has published a photo from each participant!   Talent abounds!  

Thank you, Lisa, for hosting and thanks to you all for stopping by!

Sharyl

P.S.  Happy Holidays!
***************************


Saturday, September 14, 2013

"Pearls! Pearls! Pearls" Blog Hop Reveal


I've always loved pearls.  My husband gave me a lovely strand as a wedding gift, and as many of you know, I spent the early part of this year creating pearl and crystal jewelry for my niece's wedding.   Those pearls were white, but I've also worked with freshwater pearls in deep purple, lime green, Autumn gold, peacock blue, and other rich colors!  Pearls also come in some surprising shapes beyond the basic round, looking like everything from a stick to a piece of cereal!  But whatever their color or shape,  pearls add a look of luxury, sophistication, and beauty to jewelry designs and fashion.

Shapes, sizes, quality, color, luster, and other factors help determine price.  While you often "get what you pay for" when it comes to pearls, it's also delightful that you can get nice-quality pearls at reasonable prices, and interesting, wearable pearls for even less!   It's all what you want at the time.   

My selection today is a 1/2 strand of freshwater pearls I bought at my favorite local specialty bead store, aptly named, The Bead Store.  :-)   They have an interesting rectangular shape, are wine colored with lots of shine, and  interesting black spots along the ends that look rather "burnt."  These are what I've decided to use for my entry in Michelle's "Pearls! Pearls! Pearls!" Blog Hop. 


Maybe a pearl expert can tell me if those dark ends are a bad thing, 
but in the meantime, I rather think they just add character and charm!   

I was immediately drawn to these pearls, but had a difficult time trying to decide what to pair with it.  I had purchased a lovely jasper donut-shaped stone pendant at the store to use with the pearls, and also bought some unique metal pieces while there.  When I got home, I could not decide between one of these or something else!   Decisions, decisions!   

In the end, I went for this beautiful pottery pendant made by Marti Conrad of Marti's Buttons-n-Beads.  I've been saving this quite some time-- 

I purchased this handmade pottery pendant
 (and the matching pottery beads shown below)
 from Marti Conrad's Etsy store,

and some of her combed buttons in the same matching color, a staple I try to keep on hand, I love using them so much! The soft bluish-aqua looks great with the color of the pearls!


I added Greek Mykonos beads, copper rondelle beads, 
and blackened round brass beads.


I also found some Czeck Picassa glass beads
 that matched the color of Marti's beads very well and added those!


There is blackened chain in the front and the back,
 for a slightly different look,
 inspired by the 1920s. 


I'll add small handmade darkened copper clasp in the back.

I wish I had some glamorous dress from the 1920s to go with this, but in the meantime, I think it will look great with more casual outfits too!  (That's the fun of pearls!)

I hope you've enjoyed my entry in the Pearls blog hop! Please hop over to the other entries too!


Pearls! Pearls!! Pearls!!! Blog Hop Participants:


If you have trouble linking to pages, 
please return to our host's blog at:

Many thanks for joining us today!  

~Sharyl and all!

* * * * * * *


Saturday, June 29, 2013

They are Married! Part Three: The Bride's Jewelry


"Here comes the bride!"

So we have made it to the bride's jewelry, at last!    As with the bridesmaids' jewelry, we came up with multiple plans before we settled on the final design and materials.   One thing we agreed on from the start--there would be pearls!   


I purchased multiple strands of beautiful white freshwater pearls
 (9mm, Baroque and 6mm, Potato) for the bride 

Then I added high quality white opaque and clear faceted Czech crystals in a variety of sizes from several sources.  Some were used in the bridal set.  Others were used for the bridesmaids.  I tried twisting strands, though again, without much luck.  We considered six strands, then brought the number down to three.    Even at three, I realized that the necklace seemed heavy for fastening with a ribbon.  

I went back to Jenna and we discussed the necklace wrapping clear around her neck in strands instead.   By now I had a better idea of how much a well-designed clasp could make a difference in how nicely the necklace would hang.  So I went hunting for the perfect clasp for a 3-strand necklace.   


As in pieces described in Part 1 and Part 2 of this series, 
I found exactly what I was looking for at LilysOffering on Etsy.
The back of the necklace uses a solid sterling silver connector clasp.

Sterling silver bead caps were also used on the ends on each strand.  Because of my great fear that one of these heavy strands of beads might break, the bride's necklace was double-crimped on each end and covered with silver crimp covers.

Each strand was a combination of pearls and crystals, in graduated sizes. The smallest sizes at the neck, and the larger size beads on the longest strand.  The bead patterns were each different but complementary.  


I wasn't completely sure I had done well, until my niece tried it on the week before the wedding.   I feared the patterns were too busy.  But she looked absolutely beautiful in it even in her white t-shirt and jeans,  and then I knew all would be well!


I had sent her several earring samples electronically to view, and we both like the same pair the best!  


Bride's earrings in progress.

And finally, we came to the bracelet.  You would think we could finish this up easily, but no... We had decided early on that I would make a wire cuff bracelet with beads woven through and around it.  I had made two of these some years ago in different colors, but when I tried it this time, I just couldn't seem to get the wire to shape and harden as I envisioned it.  Not at all happy with my start, I went reconsidered the design.    I reconsidered numerous designs!

And I finally decided that a bracelet to echo the design of the necklace might be the best thing of all.   We consulted, agreed, and I sent photos of sterling silver bracelet clasps in such a variety I thought it might be a pain for her to decide.   But guess what?  In moments, she chose one of my absolute favorites again!  


(Sorry, you get my arm as a model here for a moment!)
I learned this is known as a "box clasp."
It seemed very secure and so in line with our beads and design,
neither of us could resist this one!

It's solid sterling silver with 2 side clasps, and a pearl within a bezel.
I found this beauty at LGKJewelrySupplies on Etsy.


At the bride's request, a few purple beads were added to the middle row of the bracelet.  The other beads were pearls, clear and white Czech glass crystals.


So, while Jenna and I knew what the jewelry would look like, it was secret to the rest of the world until the wedding day!

  
The bride's jewelry packaged for her wedding day!

And still, there was one more surprise for me!

One thing I never considered in all of this was the impact the dim romantic side lighting would make.    While it made photographing challenging...  (Most of my photos are blurs.   The Mother of the Groom has kindly let me share these pictures below with you...)   The lighting did have the most magnificent effect on the jewelry itself!

I never expected such sparkle!  


The bride, Jenna (left) with one of her bridesmaids, Meg (sister of the groom)!
Lovely young women in every respect!


And here is the ready bride, just waiting for the ceremony to begin!
So radiant, so lovely, and such a joy!


I will thank you all once more for supporting me during this time of preparation, for reading along here and sharing my joy that things turned out, and for your wishes that the bride, Jenna, and her husband, Jake, share a life filled with much happiness!

These are beautiful young people, very special to me, and it meant the world to get to create jewelry for their special day.      And you all are wonderful friends!   I'm so glad you were willing to share this with me too!

Best wishes always,

~Sharyl

**********************************
Image Credits:

Jewelry photos by Sharyl McMillian-Nelson, Sharyl's Jewelry, 2013.

Wedding photos by Mindy Kissner, 2013.  Used by permission.

**********************************
Independence Day sale begins TODAY!
Get 15% off all items 
at Sharyl's Jewelry on Artfire!
 6/29-7/7/2013.

Must use coupon code at checkout:  

 INDEPENDENCE15

Only one coupon code may be used at a time, 
but this code is good for all jewelry and components purchased.
You may share this code with others.
You may use the code as many times as you like during the sale period.
Thank you, and have a happy 4th!

***Please sign up for my 
to keep current on sales and promotions! ***

**********************************

Tuesday, June 25, 2013

They are married! The Wedding Jewelry: Part One


Both bride and groom said their "I do's" in this lovely location 
at the wedding ceremony, Saturday evening, June 22.

But it all began way before then!   Before they gathered at 11am to begin their dressing, before the Friday night rehearsal and dinner, before the year-plus engagement, and even before that!   

Even planning for the jewelry, one small part, my small part, started nearly a year ago.    There were discussions regarding designs and materials, a mock-up necklace, and shopping for beads, wire, findings, and accent pieces.   

There was to be jewelry for the bride (my niece, Jenna), 5 bridesmaids, and 2 junior bridesmaids.   The colors the bride selected for the wedding were a deep purple and orange.    

File:RGV color wheel 1908.png
From Wikipedia

Did you ever consider how many shades of purple there really are?   Way more than I ever considered, I assure you!    In the Fall of 2012, I was busy ordering all the supplies I thought we would need.    For the bridesmaid necklaces, the bride and I had decided on ropes of purple pearls wrapped around one another going part way around the neck, then finished with long ribbons that would stream down the back.   There would be a few orange beads scattered among the strands.   It was the first decision made.   The bride's necklace would be in larger white pearls and a similar style,... but I get ahead of myself.   

The first sets of pearls that looked "just the right color" on my computer monitor to match the dresses turned out to look more a bright-pink once they arrived, and the "rethinking" began.    With the dresses solid dark purple, how would we ever make a good match ordering purple pearls to match?  Then a "light bulb" moment came, and we decided on purple crystals (which would reflect slightly different colors anyway) combined with white freshwater pearls.    And then, the worry, how to get the pearls the shape, size, color, quality and quantity we needed.   I heard my self say out loud, "If only I could see them first."   


And suddenly it occurred to me to visit one of our local independent bead stores,  

I walked in the door,  and I walked out with not only all the pearls I needed, but also what turned out to the perfect purple crystals for the bridesmaids!   What a huge relief that was!

I found these lovely connectors for the necklaces at what quickly became one of my favorite stores for sterling silver, LilysOffering on Etsy.


And I knew immediately where to go for our favorite, 
soft "Shabby Wrinkled Ribbons," 


Once I tried twisting these bead ropes though, I knew we had another bit of "redesigning" to do.  Perhaps because the bead section wasn't long enough, they wouldn't wrap more than once!   Not the look I was going for!   So, I tried this more simple design instead, and this is what we stayed with.  


By experimentation, I learned what worked well and what didn't
in making multi-strand necklaces hang properly.

You'll also see some loose space between the beads here.  I later filled these in with small decorative jump rings which made for a nice look.  And eventually got better with the crimping and crimp caps so that later necklaces had no gap showing.  Practice makes perfect (or at least much better)!


The bracelets were actually the first items I made.   While we considered other designs, memory wire won out for its ease of making so many bracelets and having one-size-fits-all.   I ordered dark purple and orange crystals and gemstones, believing that mixed together, they would blend.   A few ended up out of the color range, but most worked.  I added a little silver, mixed up the patterns on each, and added this charm on each end.


The spiral charms symbolize the journey of life.


It was satisfying to see this step finished!

And the last item made for the bridesmaids were their earrings.   They have the same basic look, but because  some prefer bigger/longer and others smaller/shorter, some dangly, others not, there is some subtle variety.  


Some variations on the bridesmaid earrings.


Some with larger beads.


Bridesmaid packages being prepared.


I was invited to the bridal party's wedding day preparations. 
Here, the bride, Jenna, is presenting the groom's sister, Meg, with her necklace. 

I came with my tools and beads, and back-up jewelry, just in case there were adjustments that needed to be made at the last minute.  What I witnessed instead was the bride presenting each bridesmaid her jewelry and helping each with her necklace. 

This was such a special part of the day for me, and believe it was for them as well!  The bridal party all looked so lovely!

We'll have more on the Wedding all this week!   Hope you'll be back!

~Sharyl

***************************************************************************


Get 10% off + Free gift 
through the end of June 2013 
by using this coupon code at checkout:  

AW-10FREE

***************************************************************************